🔥 Introduction: 🎉
Welcome to today's blog, which marks day 11 of our 90daysofdevops journey! In this installment, we'll delve into more advanced topics, including git stash, cherry-pick, and handling merge conflicts. Join me as we explore these concepts together, and get ready for some hands-on practice! 🚀🙌😊
Git Stashing
When working with Git, you might often need to switch to a different branch for other tasks. However, your current work may not be in a clean state, with some changes made to tracked files and some staged changes not yet committed. Committing half-done work just to switch branches is not ideal as it clutters your commit history and may lead to issues later on. 🚫🌪️
This is where the git stash command comes to the rescue! 🦸♂️
What is Git Stash?
Git stash is a powerful and handy command that allows you to save the current state of your working directory, including modified tracked files and staged changes, onto a stack of unfinished changes. 📚📝 This stack is commonly referred to as the "stash." The changes stored in the stash can be later reapplied or even transferred to another branch, giving you the flexibility to switch branches without the need to commit your unfinished work. 🔄🔃

How Git Stash Works:
Stashing Your Changes: To stash your changes, simply run the following command:
git stash save "Your stash message"The optional message
"Your stash message"is useful for describing the changes you are stashing, so you can easily identify them later. 🗂️🗒️Switching Branches: After stashing your changes, you are free to switch to a different branch using the
git checkoutcommand without worrying about committing incomplete work.git checkout <branch-name>Viewing Your Stashes: You can view your stashed changes by running:
git stash listIt will show you a list of stashes along with their stash references (e.g.,
stash@{0},stash@{1}, etc.) and stash messages. 👀📜Applying Stashed Changes: To reapply the stashed changes and restore the saved state, use the following command:
git stash apply stash@{0}The
stash@{0}represents the specific stash reference you want to apply. If you omit the reference, Git assumesstash@{0}by default. 🔄🔙Popping Stashed Changes: If you want to apply and remove the most recent stash from the stack, you can use the
git stash popcommand:git stash popThis will apply the changes and remove the topmost stash from the stack. 📋💨
Clearing Stashed Changes: If you no longer need certain stashed changes, you can clear them from the stash stack using:
git stash drop stash@{0}Similarly, if you want to clear all stashed changes, you can use:
git stash clearGit stash is a valuable tool for managing your work efficiently, allowing you to switch between branches without committing incomplete changes. It provides a safe and organized way to store unfinished work and reapply it later when you're ready to continue working on it. This flexibility makes Git stash an essential command in your Git workflow. 🧰💼
Git Cherry-Pick🍒
Git cherry-pick is a powerful command that allows you to apply specific commits from one branch to another. It's like plucking individual commits from a branch and copying them to another, enabling you to introduce changes selectively without merging entire branches. 🌟🌿
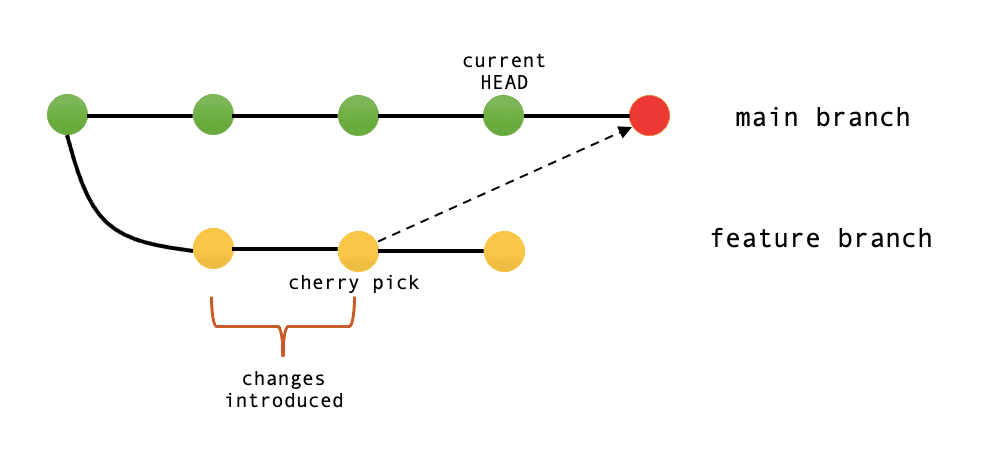
How Git Cherry-pick Works:
Choose the Target Branch: First, ensure you are on the branch where you want to apply the changes. This branch is often referred to as the "target branch." 🎯
git checkout <target-branch>Identify the Commits: You need to identify the specific commit(s) that you want to pick from another branch. You can find the commit hashes using
git logor other Git history visualization tools. 🔍📜Cherry-pick the Commit(s): Once you have the commit hash(es), you can cherry-pick them using the following command:
git cherry-pick <commit-hash>If you want to cherry-pick multiple commits, list them in order:
git cherry-pick <commit-hash1> <commit-hash2> <commit-hash3> ...Git will apply the changes from the specified commits onto your current branch.
Resolve Conflicts (if any): Sometimes, cherry-picking may lead to conflicts if the changes in the picked commit(s) clash with the existing codebase on the target branch. Git will prompt you to resolve these conflicts manually. 🤝🚧
After resolving conflicts, stage the changes using
git addand complete the cherry-pick with:git cherry-pick --continueAlternatively, if you decide to abort the cherry-pick due to conflicts or any other reason, use:
git cherry-pick --abortCherry-pick and Edit: You can also cherry-pick a commit and make additional modifications before committing it. This allows you to tweak the changes to fit the target branch better. To do this, use the cherry-pick command with the
-eor--editflag:git cherry-pick -e <commit-hash>This will open the commit message in the default text editor, allowing you to make changes before committing. 📝✨
Usage Scenarios:
Backporting Fixes: Cherry-pick is commonly used to backport bug fixes or updates from a newer branch to an older, stable branch. This way, you can ensure that critical changes are applied to multiple branches without merging the entire development history.
Selective Feature Addition: If a feature or improvement was developed on a separate branch, you can cherry-pick only the relevant commits to integrate the feature into the main branch, keeping the commit history clean and focused.
Resolving Merge Issues: In some cases, merging branches may not be straightforward due to conflicts. Cherry-picking specific commits can be an effective way to bypass these issues and still introduce necessary changes to the target branch.
Git cherry-pick is a valuable tool for selectively applying commits from one branch to another, providing fine-grained control over your version control workflow. However, be mindful of potential conflicts and always review the changes carefully before committing. With cherry-pick, you can maintain a clean and organized commit history while incorporating specific changes where needed. 🍒🌳
Task 1
Sure! Let's break down the steps and explain each part of the code:
Create a New Branch and Make Some Changes:
 # Create a new branch and switch to it
 git checkout -b uat

 # Make some changes to the files
 # For example, edit, add, or delete some code
 # ...

 # Save the changes to the stash without committing them
 git stash save "Changes on uat branch"
Explanation: We created a new branch called "uat" and made some changes to the files. However, instead of committing the changes, we used
git stashto save them on the stash stack.Switch to a Different Branch, Make Some Changes, and Commit:
 # Switch to a different branch (e.g., dev or any other branch)
 git checkout dev

 # Make some changes to the files
 # For example, edit, add, or delete some code
 # ...

 # Commit the changes
 git add .
 git commit -m "Working in dev branch and testing stash"
Explanation: We switched to the "dev" branch, made some changes to the files, and committed them.
Apply the Stashed Changes on Top of New Commits:
 # Switch back to the "uat" branch
 git checkout uat

 # Apply the stashed changes on top of the new commits
 git stash pop
Explanation: We switched back to the "uat" branch and used
git stash popto apply the stashed changes on top of the new commits made in the "dev" branch.Resolve Conflicts (if any):
After applying the stashed changes, Git detected conflicts between the stashed changes and the new commits. The code
On branch uat All conflicts fixed but you are still merging.indicates that you need to resolve these conflicts manually. The conflicted files will be marked, and you need to edit them to resolve the conflicts.Finalize and Commit the Stashed Changes:
 git add .
 git commit -m "Working in uat branch and learning stashing"
Explanation: After resolving the conflicts, we used
git add .to stage the changes and then committed them usinggit commit. The commit message indicates that we finalized the stashed changes on the "uat" branch.Git Log and Git Stash List:
Finally,
git logdisplays the commit history, showing the commits made on both the "uat" and "dev" branches.git stash listwas used to check if there are any stashed changes remaining, but it returned no results since we successfully applied and committed the stashed changes.
This completes the demonstration of using Git stash to save changes, switch branches, make commits, and then apply the stashed changes back on top of the new commits. Remember that Git stash is a useful feature to temporarily save changes and switch between tasks without committing unfinished work. However, handling conflicts during stash apply or pop requires careful attention and resolution. Happy coding! 🚀🌟
Task 2
Switch to the Development Branch and Make Changes to
version01.txt:# Switch to the development branch git checkout dev # Open and edit version01.txt # Line2>> After bug fixing, this is the new feature with minor alterationSave the changes in the file.
Commit the First Set of Changes:
 git add .
 git commit -m "Added feature2.1 in development branch"
Make Additional Changes to
version01.txt:# Open and edit version01.txt # Add the following line after the previous changes # Line3>> This is the advancement of the previous featureSave the changes in the file.
Commit the Second Set of Changes:
 git add .
 git commit -m "Added feature2.2 in development branch"
Commit the Third Set of Changes:
 # Open and edit version01.txt
 # Add the following line after the previous changes
 # Line4>> Feature 2 is completed and ready for release
Save the changes in the file.
 git add .
 git commit -m "Feature2 completed"
Create and Switch to the Production Branch from the Master Branch:
 # Switch to the master branch
 git checkout main

 # Create the production branch from the master branch
 git checkout -b Production
Rebase the Production Branch with the Development Branch:
 # Rebase the production branch with the development branch
 git rebase dev
During the rebase process, Git will apply the commits from the development branch (feature2.1, feature2.2, and Feature2 completed) on top of the production branch.
Push the Changes to Remote Repositories:
 # Push the production branch to the remote repository
 git push origin Production
Now, both the development and production branches will have the same set of commits with the same commit messages.
After doing this you can check your github repo on the Production branch
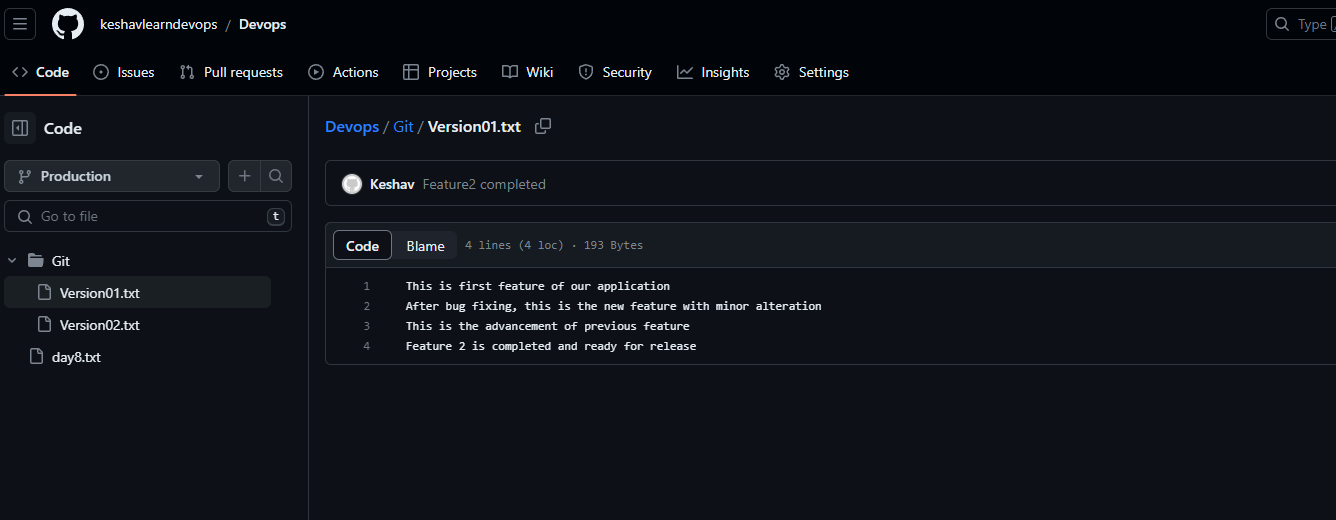
Remember, rebasing should be done with caution, especially if the branches are shared among multiple developers. It's always a good practice to communicate with your team before performing any significant changes to the branch history.
Task -3
To cherry-pick the commit "Added feature2.2 in development branch" into the Production branch and make additional changes, follow these steps:
Switch to the Production Branch:
git checkout ProductionCherry-pick the "Added feature2.2 in development branch" commit:
git cherry-pick 53aeca1Explanation: The commit hash
53aeca1is the identifier of the commit "Added feature2.2 in development branch."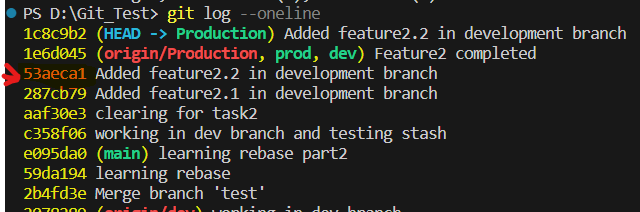
Open
version01.txtand Make Additional Changes:After cherry-picking, open
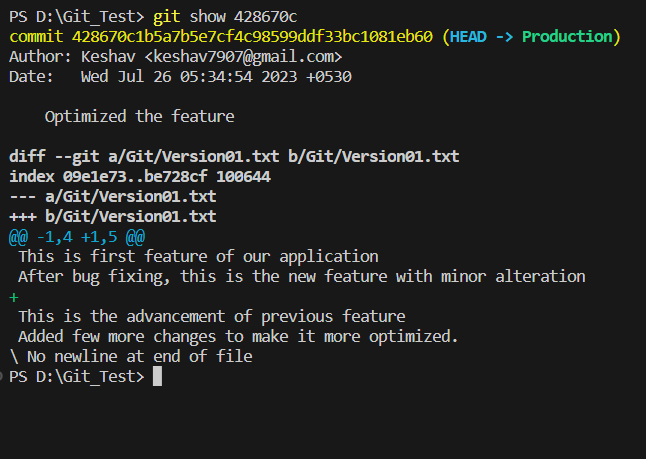
version01.txtand add the following lines after "This is the advancement of the previous feature":Line4>> Added few more changes to make it more optimized.Save the changes in the file.
Stage and Commit the Additional Changes:
 git add .
 git commit -m "Optimized the feature"
Explanation: Stage the changes and commit with the message "Optimized the feature."
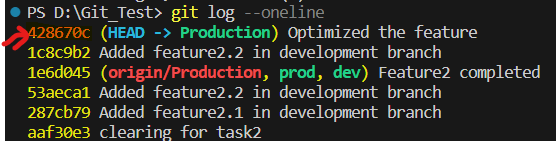
Now, the Production branch will have the cherry-picked commit "Added feature2.2 in development branch" with additional changes, including the line "Added few more changes to make it more optimized."
🎉 Congratulations on completing this insightful journey into Git and DevOps concepts! 🚀 We explored the powerful features of Git, from stashing half-done work to cherry-picking specific commits, and even mastering the art of handling merge conflicts. 😊
Remember, version control and efficient workflows are the backbone of successful development teams. 🌟 So, let's continue to embrace these best practices and elevate our collaboration to new heights!
As you continue to grow in your DevOps adventure, don't forget to experiment, ask questions, and share your experiences with the vibrant tech community. Together, we can unlock the full potential of DevOps and drive innovation in our projects.
Thank you for joining me on this 90daysofdevops journey! 🙌 Your enthusiasm and dedication make this experience all the more rewarding. If you have any questions or feedback, feel free to reach out. Until next time, keep coding, keep collaborating, and keep inspiring! 🚀🌟
Happy DevOps-ing! 😄👩💻👨💻


